“The rivets keep coming loose.” “The head pulls through.” “They spin in the hole.” When problems like these appear, the first assumption is often that the rivet simply is not strong enough.
Blind rivet problems can usually be traced to several predictable causes. When a blind rivet fails, the problem is often how it was selected or installed — not simply how strong the rivet is.
This guide works from the symptom backwards: diagnose what you see, identify the likely cause, and fix it.
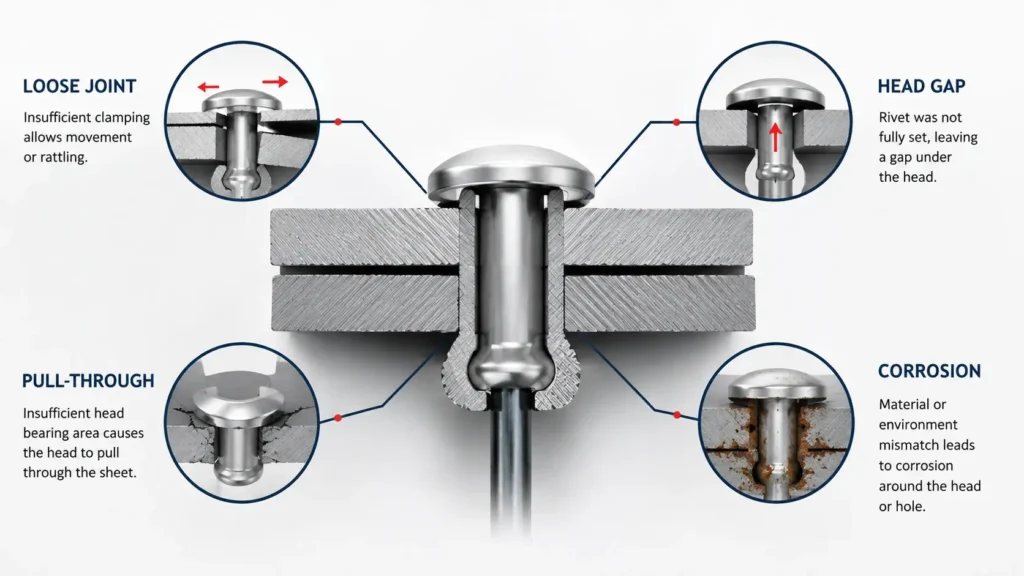
The 7 Most Common Causes of Blind Rivet Problems
Most blind rivet problems trace back to one of seven causes. This quick matrix tells you where to look first; each cause is explained in detail below.
Table 1 — Quick Diagnostic Matrix
| Diagnostic cause | Typical symptom | First check |
|---|---|---|
| Wrong grip range | Joint loose after setting | Stack thickness vs grip range |
| Incorrect hole preparation | Rivet spins or rocks | Hole size, burrs and alignment |
| Incomplete setting | Gap under the head | Setting tool and nosepiece |
| Poor rivet placement | Sheet tears at the edge or between holes | Edge distance and spacing |
| Material and environment mismatch | Corrosion around the head or hole | Materials vs service environment |
| Application demand exceeds rating | Body or head damaged in service | Application demand |
| Insufficient head bearing area | Head pulls through the sheet | Sheet support |
Each cause below follows the same sequence: what you see, what went wrong, and how to fix it. Already see a symptom? Jump to the Symptom Guide.
The examples below use an illustrative 4.8 mm blind rivet with a dome head, aluminum body and steel mandrel, a grip range of 6.0–8.0 mm, and a specified hole size of 4.9 mm (+0.1 / 0).
Cause 1: The Wrong Grip Range
What you see: the joint stays loose after setting — it moves or rattles under hand pressure, and the blind head looks small.
What went wrong: the total material thickness sits outside the grip range of that exact part number. Too thin a stack leaves too little body to form a full blind head; too thick a stack may prevent the joint from forming as intended, leaving insufficient clamping or a poorly formed blind head.
How to fix it: measure every layer with a caliper and compare the total against the grip range on the datasheet for the exact part number. In the illustrative 4.8 mm example the range is 6.0–8.0 mm: a 7 mm stack suits it; a 5 mm or 9 mm stack falls outside. For the grip range field, see our blind rivet datasheet guide.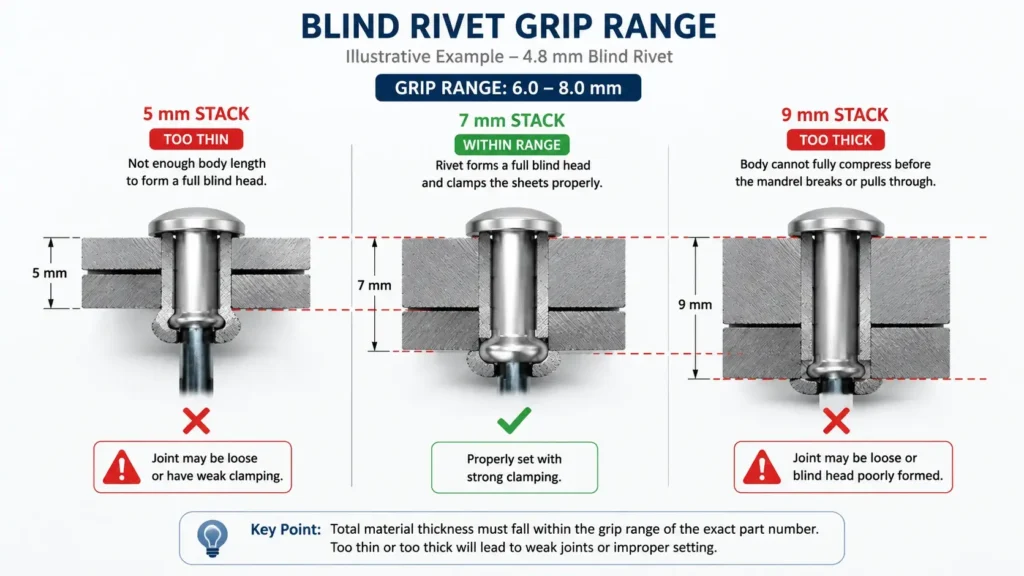
Cause 2: Incorrect Hole Size or Preparation
What you see: the rivet spins or rocks in the hole. An undersized hole can block insertion, while burrs may scratch or damage the rivet body.
What went wrong: An oversized hole leaves too much clearance around the rivet body, allowing movement and reducing proper support. In soft materials, excessive clearance can also reduce support around the hole and contribute to joint damage. A hole that is too small can prevent the rivet body from entering properly and may damage the rivet. Burrs and misaligned holes can make the problem worse.
How to fix it: Prepare the hole to the specified size and tolerance for the exact part number — 4.9 mm (+0.1 / 0) in the illustrative example. Remove burrs before setting the rivet. For the hole size field, see our blind rivet datasheet guide.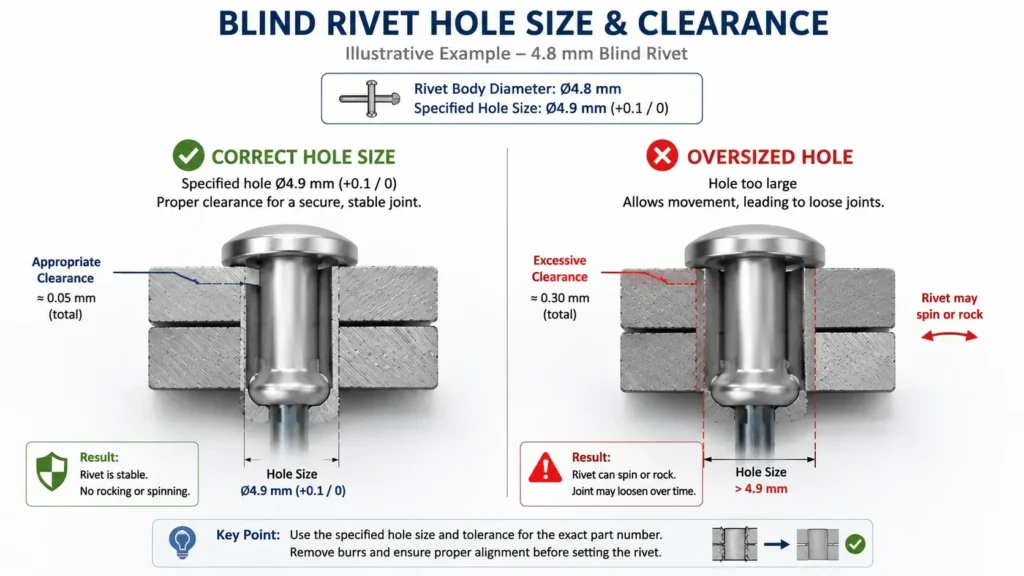
Cause 3: The Rivet Was Not Fully Set
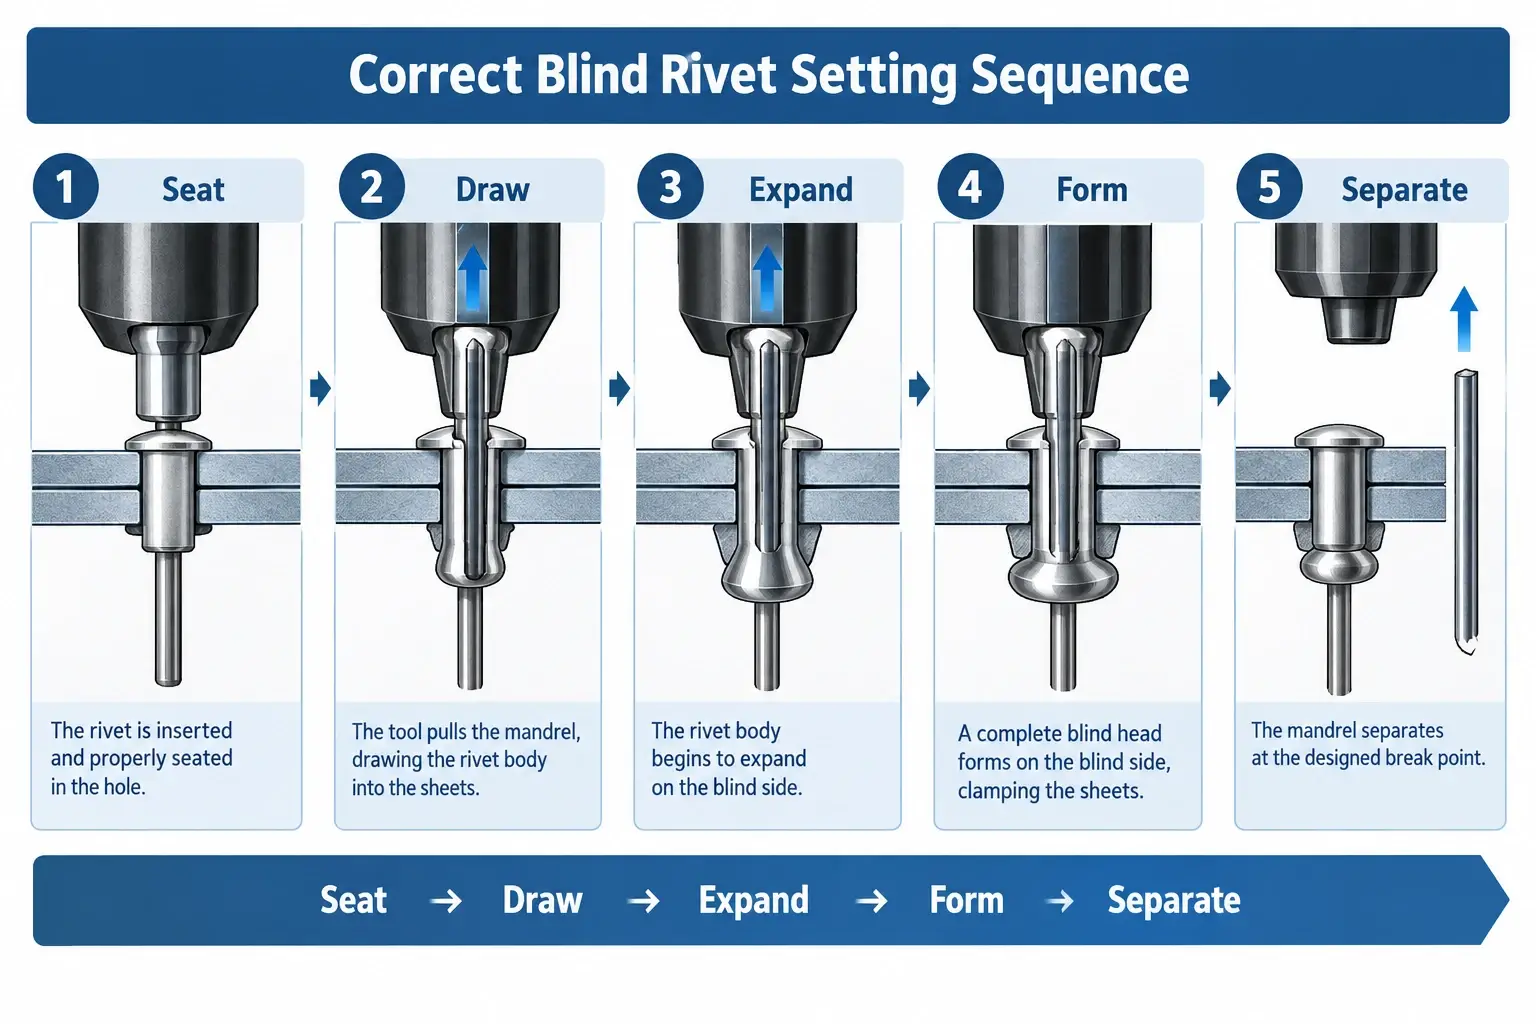
The rivet was installed, but the joint was never fully formed.
What you see: the rivet head does not sit flush — a gap remains under it — and the blind head is partly formed. The mandrel may also show an unusual break position or remain visibly proud of the set rivet.
What went wrong: setting depends on the tool matching the rivet: an incorrect nosepiece, insufficient pulling force or travel for the rivet-tool combination, worn jaws, an off-square tool, or shifting sheets can stop the joint short of a full set.
How to fix it: Use the tool according to the rivet and tool manufacturer’s operating guidance, and confirm the rivet is fully set before accepting the joint. If incomplete setting repeats, check the tool and the installation process first.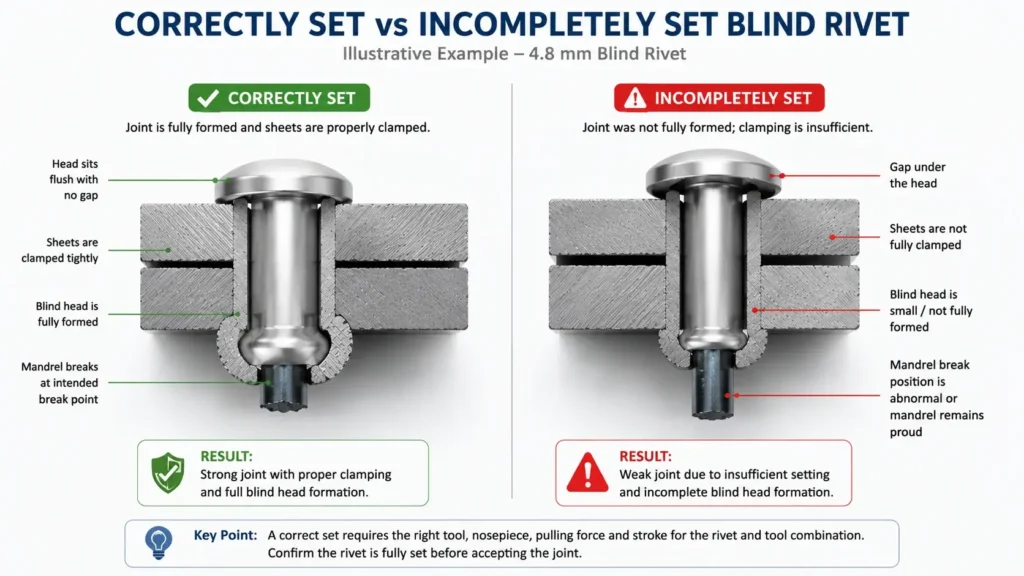
Cause 4: Poor Rivet Placement
What you see: the sheet tears at the hole edge, or a strip tears out between two holes.
What went wrong: the hole centre sits too close to the sheet edge, or the rivets are spaced too tightly, leaving too little material around them.
How to fix it: As a general starting guideline, keep the rivet sufficiently away from the sheet edge and adjacent holes. Exact requirements depend on the material and application. As an illustrative starting guideline: an edge distance of at least 2× the rivet diameter and rivet spacing of at least 3× the diameter. Softer or thinner materials may require more conservative spacing and edge distance. Maintain proper alignment during hole preparation to avoid placement errors.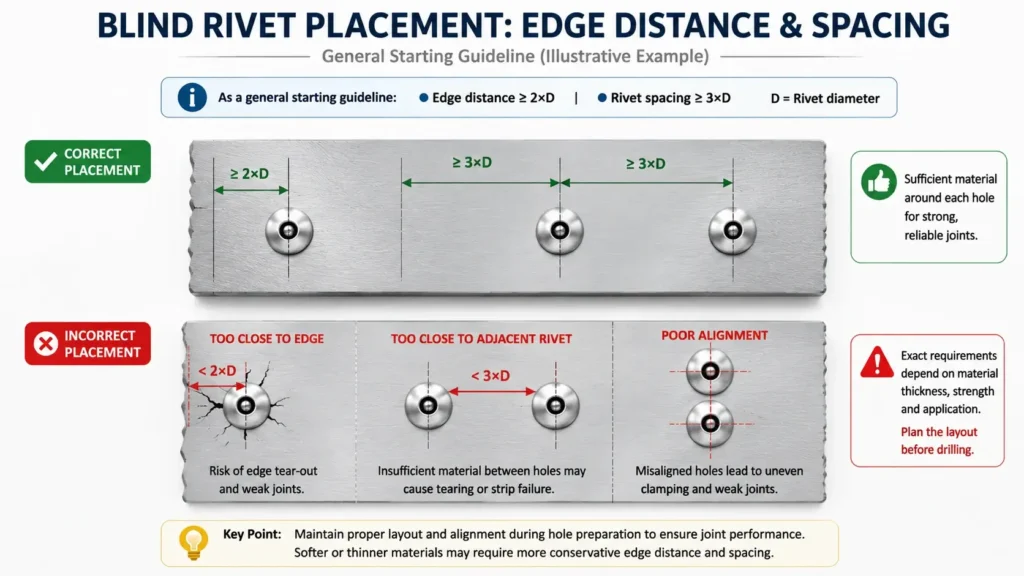
Cause 5: Material and Environment Mismatch
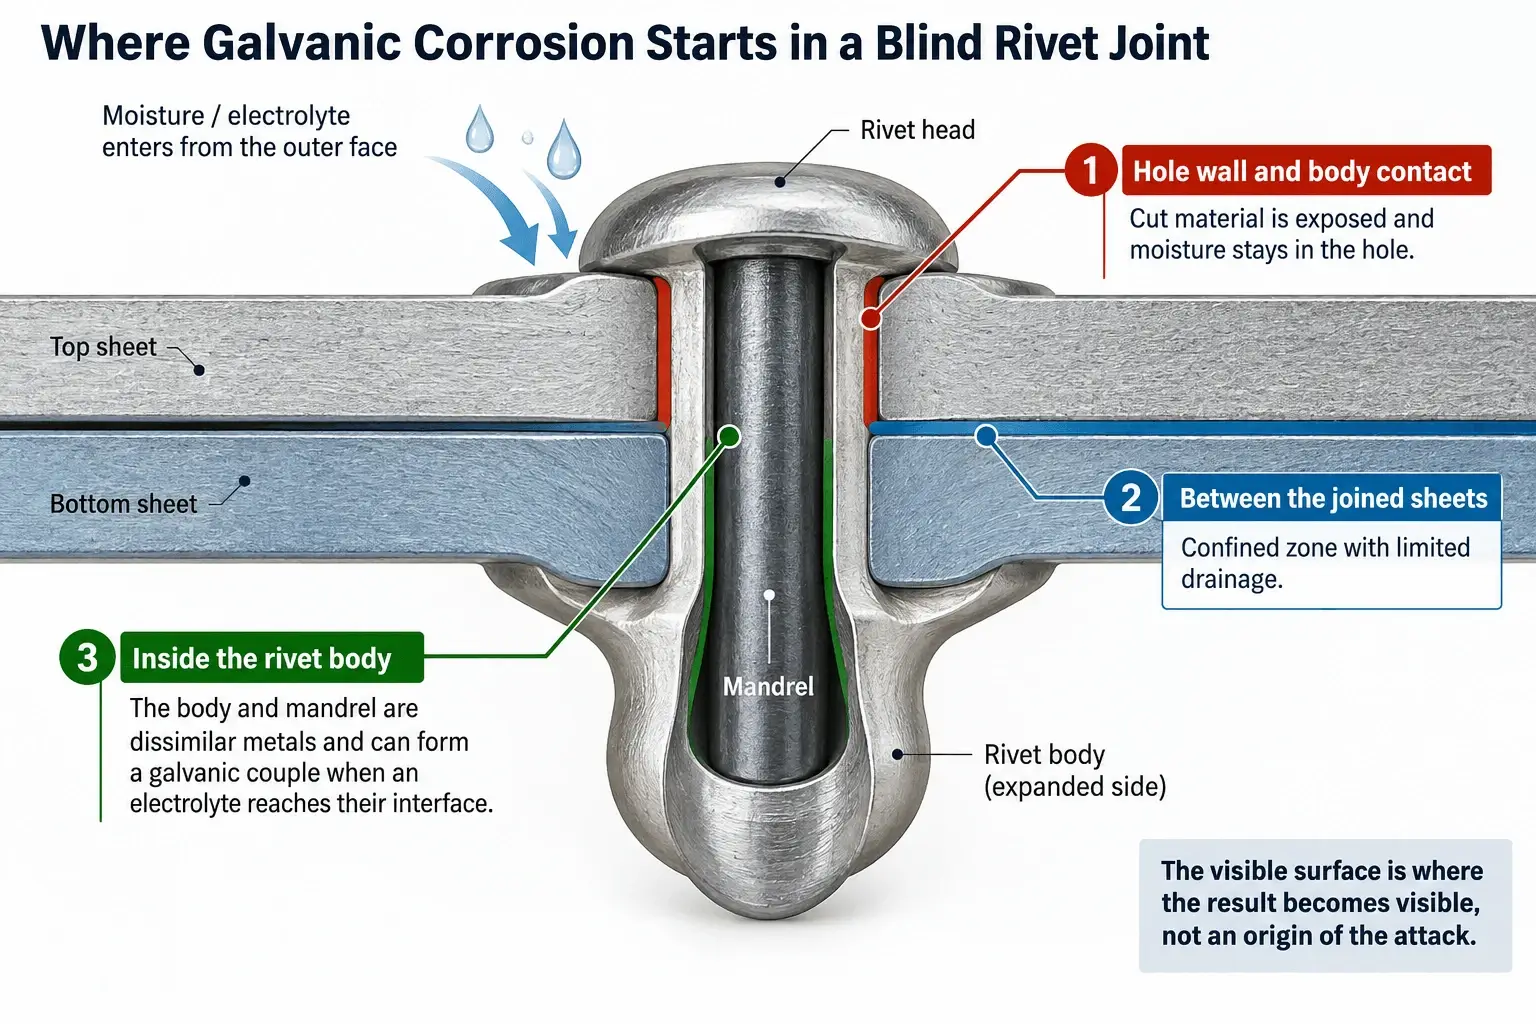
Different materials are not automatically a problem. The risk increases when the material combination is exposed to moisture, chemicals or other corrosive conditions.
What you see: corrosion around the head or hole, swelling, rust staining, joints that loosen over time.
What went wrong: the rivet and the joined sheets may have different corrosion behavior. When an electrically connected material combination is exposed to a conductive environment such as moisture or certain chemicals, galvanic corrosion can increase the risk of damage to the more active material. The illustrative aluminum-body, steel-mandrel combination may be suitable for dry indoor applications, but corrosive environments require the configuration to be checked against the service conditions.
How to fix it: Select the rivet material and finish according to the joined materials and the service environment — consider compatible material combinations where possible. Where corrosion is a concern, review material compatibility, surface protection and environmental exposure together. Learn more about blind rivet material selection in our dedicated material guide.
Cause 6: The Application Exceeds the Published Rating
What you see: the rivet body or head is damaged during service — deformed, cracked or broken.
What went wrong: the application demand exceeds the published rating for the exact part number and configuration. In the illustrative example, the published ratings are 1.4 kN in shear and 1.2 kN in tensile.
How to fix it: Recheck the application demand against the published rating for the exact part number and configuration. If the demand exceeds the available rating, review the rivet selection. For how shear and tensile ratings are defined and applied, see our guide to blind rivet shear vs tensile strength.
Cause 7: The Rivet Head Pulls Through the Sheet
What you see: the rivet head is pulled through the sheet or sinks into the hole, most visibly on thin or soft material.
What went wrong: The sheet cannot provide enough support under the rivet head. The underlying cause is insufficient head bearing area for that sheet. If the prepared hole itself is oversized, that is a hole problem — see Cause 2.
How to fix it: Increase the available bearing area or review whether the sheet provides sufficient support for the selected head style. A large flange head distributes the force over a wider area of sheet; a backing washer supports the sheet from behind. Countersunk applications require particular attention because the available bearing area can be reduced. Head-style duties are covered in our guide to blind rivet head types.
Symptom Guide: What Should You Check First?
In the field you start from what you see, not from what went wrong. Use this lookup to go from symptom to first check to likely cause, then apply the fix under that cause.
Table 2 — Blind Rivet Symptom Lookup
| Symptom | Check first | Start with |
|---|---|---|
| Rivet loose or rattles after setting | Total stack thickness vs grip range | Cause 1 |
| Rivet spins or rocks in the hole | Hole size, burrs and alignment | Cause 2 |
| Gap under the head; head not flush | Setting tool and nosepiece | Cause 3 |
| Sheet tears at the edge or between holes | Edge distance and spacing | Cause 4 |
| Corrosion around the head or hole | Materials vs service environment | Cause 5 |
| Body or head damaged in service | Application demand vs published rating | Cause 6 |
| Head pulled through the sheet | Sheet thickness and head support | Cause 7; if the hole is oversized, also check Cause 2 |
The “start with” column gives you the first check, not the only possible cause — a loose rivet, for example, can also trace to hole size or an incomplete setting. If the first check comes back clean, move across the table before concluding.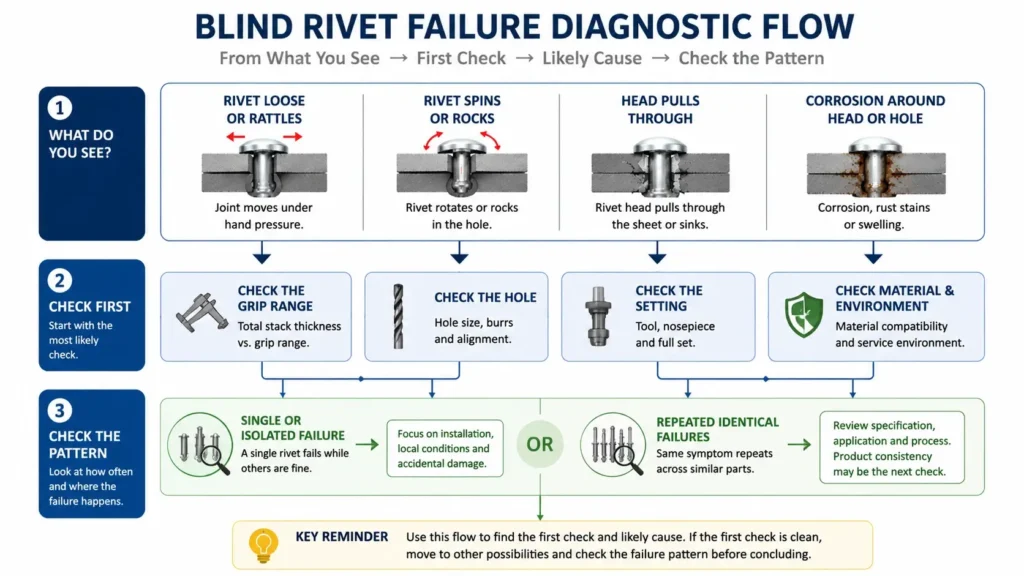
Is It the Rivet, the Installation or the Specification?
A single isolated failure is often best investigated through the installation. A repeated pattern of identical failures may point to the specification or application. Place the failure in one of three patterns:
One isolated failure. A single rivet fails while comparable joints remain unaffected. Check the installation, the local conditions and accidental damage.
Repeated failures at the same location. The same position fails again and again. Check the placement, the installation process and the application conditions there; the pattern may point to joint geometry or a local condition.
Repeated identical failures across multiple parts. Product-related problems can occur, but they should be investigated as part of a broader pattern. When the same symptom repeats across comparable parts under consistent specification, installation and application conditions, product consistency becomes a stronger possibility to investigate. Keep failed samples for analysis.
FAQ
1. Can a loose blind rivet be tightened again?
No. A blind rivet cannot normally be re-tightened once it has been set. Remove the failed rivet carefully, correct the cause of the problem, and install a new rivet with the appropriate specification.
2. How can you tell if a blind rivet was set correctly?
The head sits flush against the sheet with no gap, the blind head is fully formed, and the mandrel has broken at its intended break point. If the rivet rocks or the head does not sit flush, check the grip range and the setting. If the mandrel breaks unusually, check whether the tool and rivet are properly matched.
3. Why do my blind rivets keep coming loose?
Loose blind rivets usually mean the grip range does not cover the total material thickness, the hole is too large, or the rivet was not fully set. Measure the stack and the hole first; if both are correct, check the tool and nosepiece.
4. Why does a blind rivet pull through the sheet?
The head style carries too little bearing area for a thin or soft sheet, or the hole is too large and removes support under the head. Consider a head style with more bearing area or additional support such as a backing washer, and confirm the hole size.
5. How close to the edge can a blind rivet be placed?
As a general starting guideline, keep the hole centre at least two rivet diameters from the sheet edge and space rivets at least three diameters apart; exact requirements depend on the material and application.
6. What causes blind rivets to corrode?
Different materials are not automatically a problem. Corrosion risk increases when the material combination is exposed to moisture, chemicals or other corrosive conditions. Match the rivet material and finish to the sheets and the service environment.
7. How do you know if a rivet failure is the product’s fault?
Look at the pattern first. A single isolated failure often points to the installation or application. If the same symptom repeats across comparable parts, confirm that the specification, installation and application conditions are consistent; then product consistency becomes the next question to investigate.
Fix the Cause Before Replacing the Rivet
Don’t replace the same rivet and expect a different result. A recurring problem usually means that something in the joint, specification or installation process needs checking. Run the checks in order:
- Measure the stack.
- Check the hole.
- Inspect the setting.
- Review the rivet placement.
- Check material compatibility.
- Verify the application demand.
- Check sheet support.
Fix the cause first, then confirm whether the same rivet or a different specification is appropriate.
If repeated blind rivet problems occur in production, send RivetFast the failed rivets or clear photos together with the joint details — sheet materials and thickness, prepared hole size, setting tool, and service environment. Our engineers can review the available information, assess the failure pattern and help identify the most likely causes before recommending the next step.
Get Technical Support | Request a Quote
Note on illustrative values
Illustrative values in this article are based on blind rivet product data published by Westfield Fasteners for its DIN 7337 product range. These are supplier-published values, not values issued by the DIN standard itself. Exact values vary by manufacturer, product series and mandrel design. Always refer to the manufacturer’s datasheet for the specific part number.