You have selected the rivet. You have prepared the hole. Then the tool pulls — and the mandrel snaps off before the head forms, the rivet spins in the hole, or the head never sits down against the sheet. None of these is yet a diagnosis — each is a setting signal.
A setting problem is usually read at the tool end — where the mandrel breaks, whether the body spins, and how far the head forms. This guide reads each signal against the setting sequence, separates joint-side problems from tool-side problems, and turns every signal into a first check direction.
Setting Problems at a Glance
Most setting problems announce themselves in one of three ways. The mandrel breaks unexpectedly, the rivet or mandrel spins, or the set stops short. The table below names the three signals; the sections that follow read each one in turn.
Table 1 — Setting Signals at a Glance
| Setting signal | What it may indicate | First direction |
|---|---|---|
| Mandrel breaks unexpectedly | Setting sequence may not have completed normally | Check break position |
| Rivet or mandrel spins | Body or mandrel may be slipping | Identify what is turning |
| Set stops short | Tool or joint setup may not complete the sequence | Check tool-side conditions |
What a Correct Blind Rivet Set Looks Like
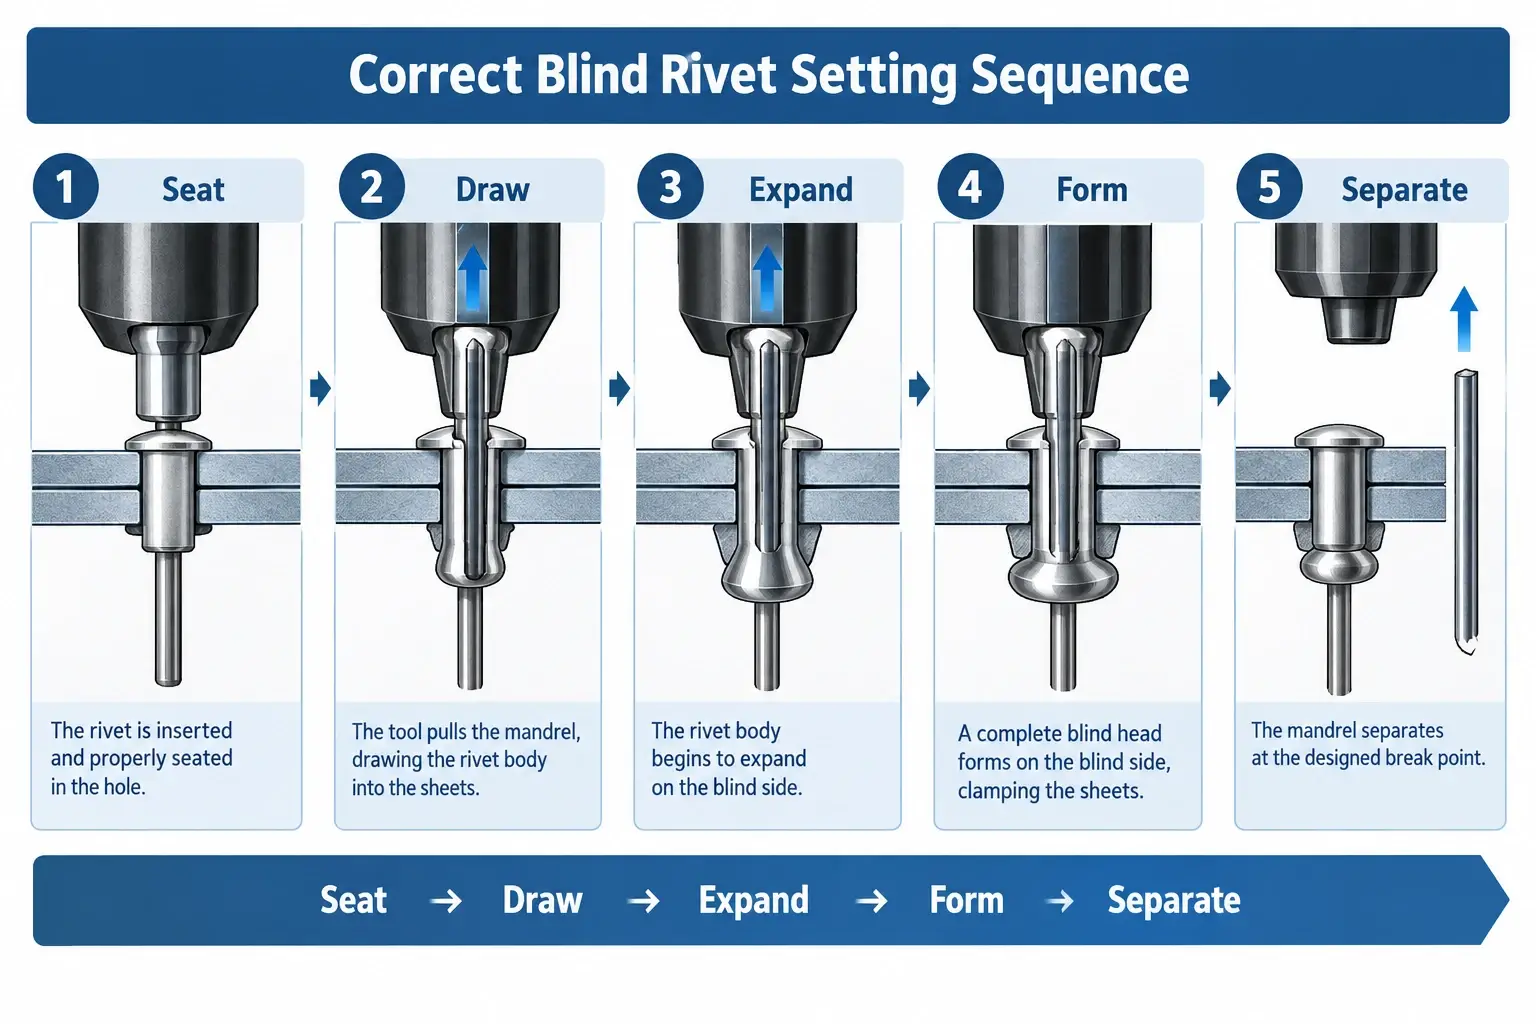
A correct set is a complete sequence. It follows a chain in which the rivet seats against the sheet, the mandrel draws the body into the hole, the body expands against the hole wall, the blind head forms on the far side, and the mandrel separates at its intended break stage.
Every stage leaves evidence at the tool end: the head either sits flush or it does not, the body either locks or it turns, the mandrel either separates or it does not. Reading a setting problem means finding the stage where the sequence stopped behaving as intended.
It also explains why one symptom can come from different directions. A head that sits high can mean the nosepiece never seated, the stroke ran out, or the sheets were never clamped together. The signal is shared; the stage where the sequence broke is not.
A broken mandrel tells you that the mandrel reached its break point — it does not, by itself, confirm that the joint is correctly clamped. That distinction shapes everything that follows.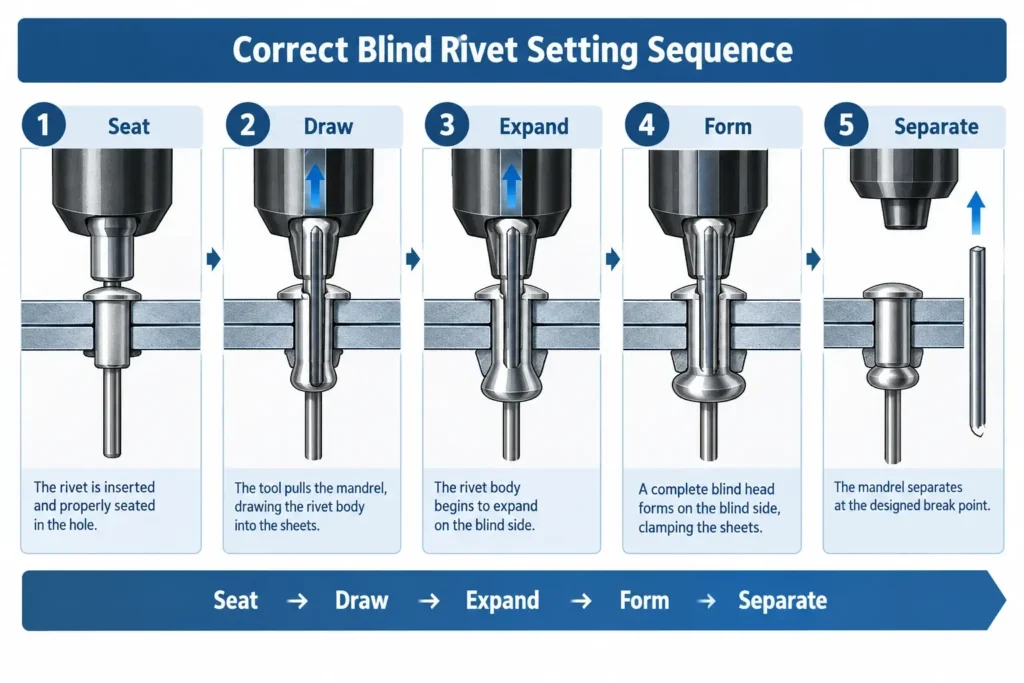
Mandrel Break: What the Break Position Tells You
Break position helps narrow down which part of the setting sequence may not have completed normally. Where the mandrel separates relative to the sequence is the most information-rich signal at the tool end — but it is a clue, not a verdict.
Table 2 — What the Break Position May Suggest
| Observed break position | What it may suggest | First check |
|---|---|---|
| Breaks earlier than expected | The setting sequence may have stopped before the intended stage | Measured stack vs specified grip range; tool condition |
| Breaks at the expected point | The mandrel reached its expected break stage | Head formation and joint clamping |
| Mandrel remains unusually proud after setting | Expansion or pull may have fallen short of the intended stage | Stroke, nosepiece seating, jaws |
| Mandrel does not break | The setting sequence may not have reached the break point | Tool capability and jaw grip |
Two habits make the table usable. First, describe the break as an observation — the mandrel let go before the head looked fully formed — rather than jumping to a cause. Second, treat the first check as a direction, not a conclusion: the point is to know which stage to look at, not to convict the rivet, the tool or the hole on one signal.
The row that matters most is the one that looks like success. A mandrel that breaks at the expected point has reached its break stage, and that is all it proves. Head formation and joint clamping still need to be checked against the application requirements — which is why a broken mandrel alone never confirms a good joint.
If the mandrel does not break at all, the sequence may never have reached the break point, and the check moves to tool capability and jaw grip.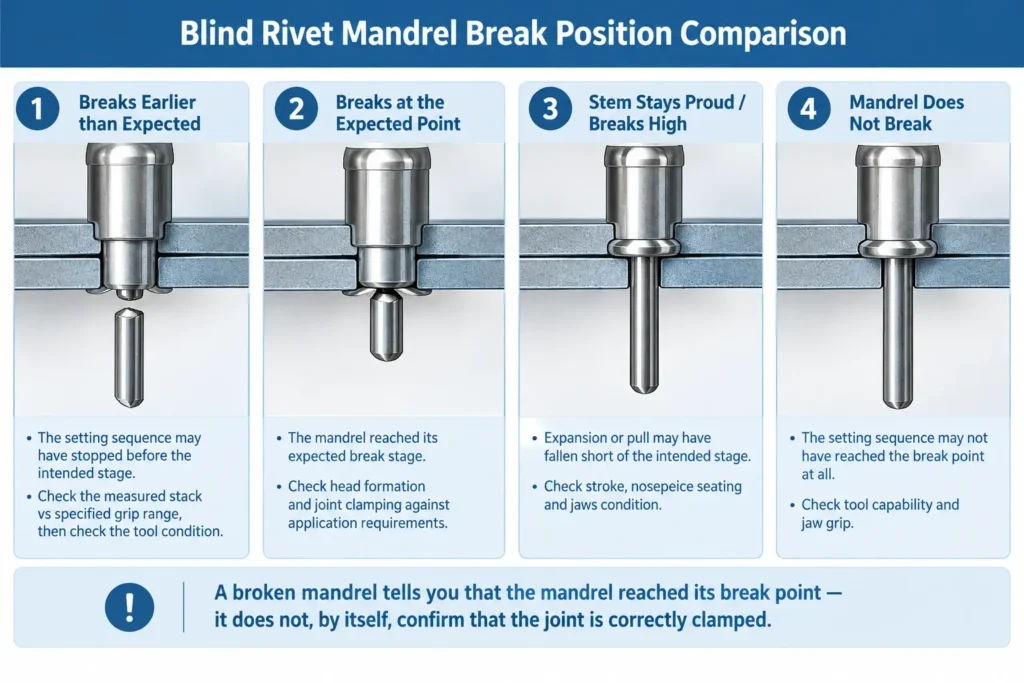
Rivet Spinning During Setting: Body Turning vs Mandrel Slip
If a rivet appears to spin during setting, separate two different conditions: the rivet body may be rotating in the hole, or the mandrel may be slipping in the jaws. These are different problems even though they can look similar at the tool end.
Body turning in the hole. The rivet body rotates with the tool instead of remaining stable in the hole. The mandrel may still pull and the head may still form. This condition points toward the hole and joint side.
Mandrel slipping in the jaws. The mandrel does not appear to advance normally through the jaws. It may feed erratically, stall mid-pull, or slide back out while the body barely moves. This condition points toward the tool side — the jaws are not holding and feeding the mandrel the way the setting sequence requires.
The discipline in this section is to stop at identification. Both observations are directions, not diagnoses: what is turning, and what that turning points toward. The causes behind each direction are collected in the routing section at the end of this guide.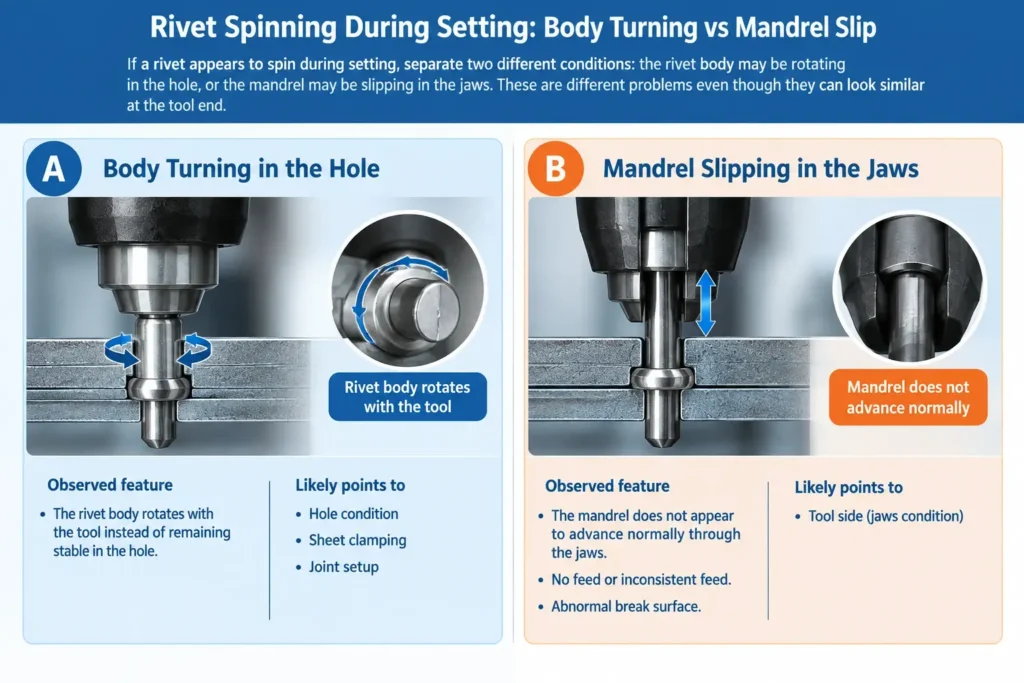
Incomplete Setting: When the Setting Sequence Stops Short
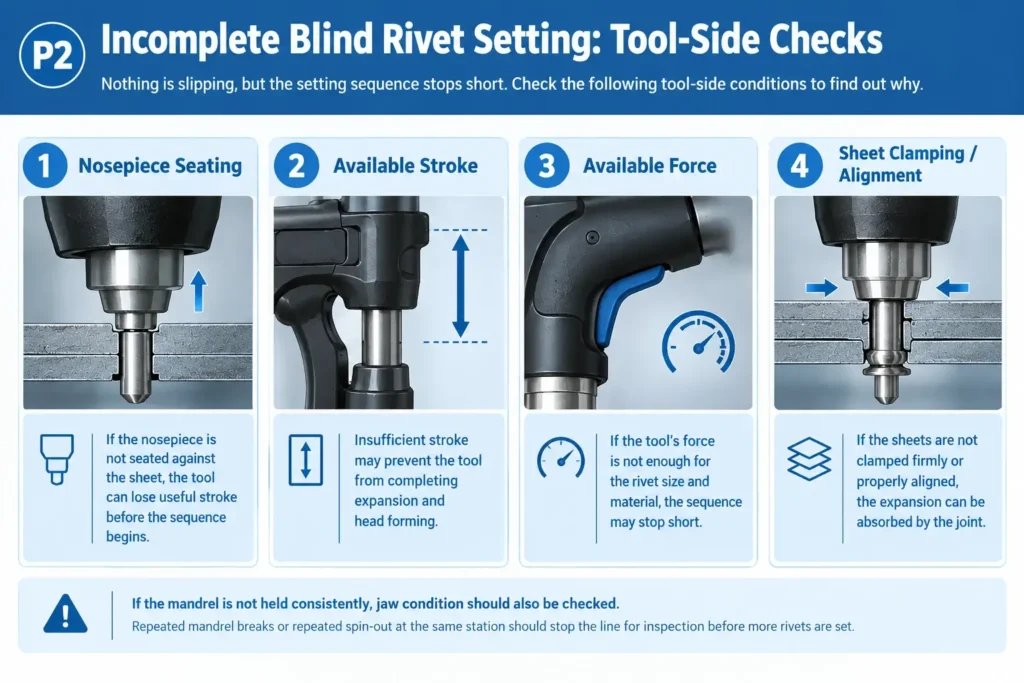
The third signal is quieter: the setting sequence stops before the joint is fully formed. The head sits high, the body is under-formed, or the mandrel never separates. The checks run through the conditions the sequence depends on.
Start with nosepiece seating. If the nosepiece is not flush against the sheet when the pull begins, part of the available stroke is lost before effective setting begins.
Then check available stroke — whether the tool has enough travel to complete expansion and head formation in a single pull — and available force, in the sense of whether the tool has sufficient capacity for the rivet and joint configuration. Neither check needs a number to be useful; the question is whether the sequence can finish, not what the tool is rated at.
Check sheet clamping and alignment next. If the sheets are not drawn together, part of the pull is absorbed closing the gap instead of forming the joint, and the head sits high as a result.
And if the mandrel is not held consistently, jaw condition should also be checked — once the conditions above are confirmed.
Repeated mandrel breaks or repeated spin-out at the same station should trigger a stop-and-inspect check before more rivets are set.
Tool, Hole, Grip or Joint Setup: Where to Check First
Three signals, four directions. Route what you saw to the side it belongs to: Tool — jaws, nosepiece, stroke and capacity; Hole — hole condition and hole size; Grip — the measured stack against the specified grip range and the rivet selection; Joint Setup — tool angle, access, sheet clamping and positioning.
Table 3 — Routing a Setting Signal
| Signal | Check first | If it repeats |
|---|---|---|
| Mandrel breaks early | Break position, stack vs specified grip range, tool condition | Inspect tool/setup |
| Mandrel remains proud / head under-formed | Stack vs grip range, tool stroke | Review rivet/tool match |
| Body turns in hole | Hole condition, sheet clamping | Check hole control |
| Mandrel slips in jaws | Jaws and nosepiece condition | Follow tool manufacturer’s service guidance |
| Head sits high / set stops short | Nosepiece seating, stroke, clamping | Review setting setup |
Where the routing points to the hole side, it helps to know the hole is already controlled — see our guide to blind rivet hole tolerance for how to hold and verify it. Where it points to the tool, follow the tool manufacturer’s guidance rather than servicing the tool on the line.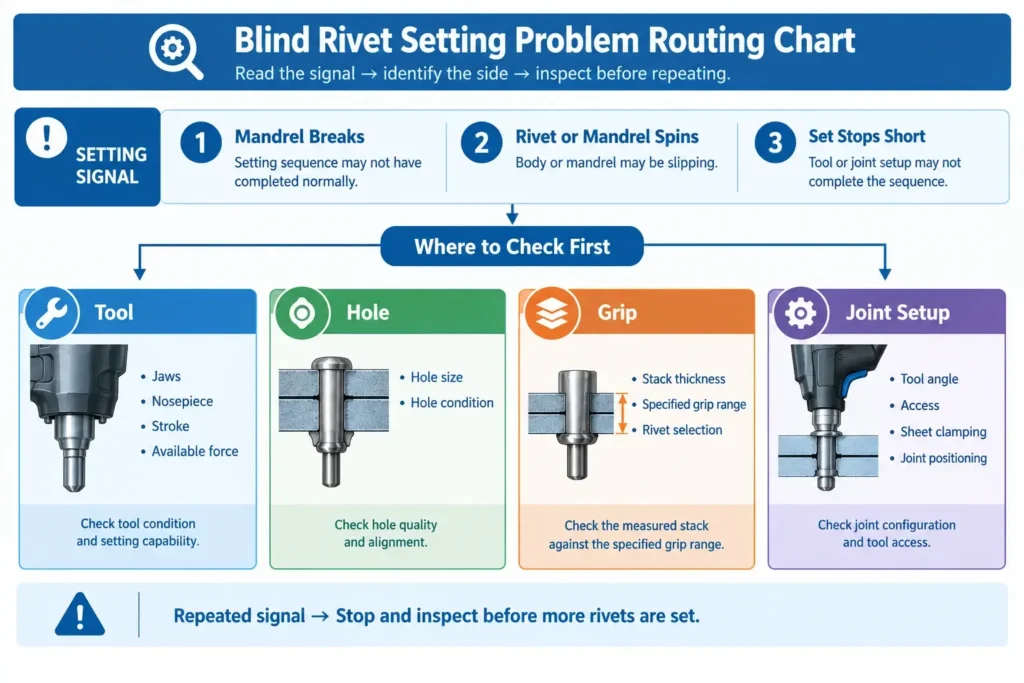
FAQ
Short answers to the questions this guide is asked most. Each stands on its own.
1. Why does my blind rivet mandrel keep breaking?
Repeated mandrel breaks usually warrant checking the setting conditions rather than assuming the rivet itself is defective. Check the break position, grip/stack match and tool condition before repeating the setting cycle. If the same signal appears at the same station, stop and inspect before setting more rivets.
2. What causes a rivet mandrel not to break?
The setting sequence may not have reached the break point — commonly because the available stroke or tool capacity is insufficient for the rivet and joint configuration, or because the mandrel is not being held and fed consistently by the jaws. Compare where the sequence stopped with what a complete set requires.
3. Why is my rivet spinning in the hole?
First identify what is moving. If the rivet body rotates with the tool, the problem points toward the hole and joint side. If the mandrel slips in the jaws instead of advancing, it points toward the tool side. They can look similar at the tool end, but they are different problems.
4. Why won’t my blind rivet set fully?
The setting sequence is stopping short. Check nosepiece seating, available stroke and tool capacity, and whether the sheets are clamped tightly together. A head that sits high usually means expansion and head formation did not complete. If the mandrel is not held consistently, jaw condition should also be checked.
5. Does a broken mandrel mean the joint is good?
No. Mandrel separation only indicates that the mandrel reached its break stage. A break at the expected position is a useful signal, but joint quality should be confirmed separately by checking head formation, clamping and the applicable joint requirements.
6. How do I tell whether the problem is the tool, hole or rivet?
Start with the signal rather than replacing the rivet immediately. Check the break position, identify whether the body or mandrel is moving, then check the tool, hole, grip and joint setup in that order.
Read the Set, Then Route the Fix
A setting problem is rarely solved by pulling again. Read the signal — where the mandrel broke, what was spinning, where the sequence stopped — then route it to the tool, the hole, the grip or the joint setup, and inspect before repeating. The signal tells you where to look; only the check tells you what happened.
If you are troubleshooting a setting problem and want a second pair of eyes on the rivet and the conditions around it: Send us your part number, setting tool and nosepiece, measured hole size, and stack thickness. Our team can help review whether the rivet, hole and tool setup are properly matched.